Friday, June 28, 2013

B&W DIY painting

Have you guys seen these West Elm abstract b&w paintings?


They are actually on sale right now from $99 a piece down to $69.99 a piece.  Well, they are pretty but I think I would be sleeping in the bathtub for a week if I bought a $70 piece of art right now. No. I'm kidding. Tom isn't that mean. It would be more like a couple nights ;) Anyways, I'm working on a gallery wall and right now we have a pretty one but when I hung it, all I had were pictures from our wedding.  So it's just a big shrine wall of Bre and Tom.  That needs to go. Onto my point! (geez I can ramble)


Pretty great, huh? Actually, I chose it for it's frame. I liked the slim black look and for $2? Done.


I had to just tape off the frame because I couldn't figure out how to get it out and didn't care to try. (A for effort) I just painted some white right over the poster.  I was rushing to get pictures because the sun was setting fast but I will get some up close later to show my brush strokes.  You won't want your paint perfect and even (it's great for a girl like me who can't wait between coats) The more thick layered/thin layered parts and uneven strokes, the better. It will add depth! Then I used a foam brush and just painted some black lines and stripes letting my brush run out of paint in places.  The design really doesn't matter. I just added black until I felt like it was balanced and I was happy with it. Have fun with it!


For $2, not too bad, eh?? That's what I love about modern art. Most of the time I look at it and think "my niece could do that. And she can't even say 'modern art'!" So yes, even you can do this!! And if you're not too hot on the black and white, try out some other colors to fit your room! And then send me pictures of them so I can feel all happy and proud like that time I taught my mom's 3rd graders how to paint trees. :)


And a sneak peek of what's coming to you soon!!! (I know, you're thinking to yourself What IS that brass goodness??) Well you'll just have to wait to find out.


Thursday, June 27, 2013

Proof I'm eclectic

On Tuesday, our computer was open but charging while I was cleaning and doing some homework.  After awhile, I picked it up to use it and it wouldn't turn on no matter what I did.  I panicked a bit but had to run off to class right then. Yesterday we took it to the mac store and found out it was just the charger. Buying a new $80 charger wasn't exactly what we were hoping to do right now but it was a ton better than getting a new computer. (And they gave us the wrong charger despite having our computer in store, so I made another trip today to exchange it for the right one.) So long story short, that is why I skipped a day of blogging yesterday. :)
Anyways...

While I was shopping at Homegoods the other night, I snapped a few pictures of some things I am loving. 


This is a garbage can! It is hard to tell but it was square and mirrored with designs in the mirror that made it look sparkly.  It would be SO glam for a little girls room or bathroom.


I love the look of these.  They remind me of Restoration Hardware.  After examining this, I think it would be really easy to make.  I'll give it a try and if it works out, I'll post a tutorial.


I also love the idea of bringing some of nature indoors.  These grapevine balls would be fairly easy to make.


This is the lid of a jewelry box.  I am in love!!! As you may know. I am really into bright floral designs right now and this is exactly what I love. 


This is the inside of the jewelry box.  A pretty little organizer with a beautiful lid.


This is a vanity tray!!! Holy. I wanted it. If you can't tell, it's embroidered with silver sides.  If you're afraid of color, try something like this.  You will have things set on the vanity tray revealing only parts of the bright colors.  It would be a great conversation piece without being too distracting.

Aren't those random together?  I would put them all in my house, I guess we could say I'm a bit eclectic.

Btw, hello summer!! It was 100 degrees at 7:30 tonight. Bring on the popsicles!

Tuesday, June 25, 2013

Kitchen cabinet update

So when we moved in to our house, this was the only counter in the kitchen.  And you can't tell how small it is here but our microwave and toaster took up all of it. (there was a TINY space in front of the toaster) But the top of it was this gross peel and stick plastic stuff stuck on an old gross board that was peeling off in places and I felt like it could never be clean.  The part that is peeling off a lot was underneath the microwave.  I did this a long time ago and in my haste for getting rid of it forgot to take before pics.


I undid a few screws and the board came right off.  Next, I bought a remnant countertop for $20.  I got mine at a store in Salt Lake City called Chris and Dick's, but if you are out of the state call around and ask companies that specialize in cabinetry and countertops if they have any remnants.  They rarely have stone, so if you are okay with laminate, it is really cheap.


Above you can sort of see the white cabinet before I painted.

I measured to the size I wanted it and then drew a line on the underside with a straight edge and cut it with a jigsaw.  It's not perfect and one edge isn't finished but I don't really care because it is a huge upgrade from our counter before.  


Next I painted the whole base black with the leftover paint from this and this project.


Right now the counter is just sitting on top of the cabinet but with my kitchen aid, it is held down pretty well.  Eventually I will put in some screws where the old ones were.  


I bought a bookshelf for $5 at the D.I. and painted it black as well and our micro and toaster sit there now. (Photobombing Stella)


Next I wanted to redo the upper cabinet.  Since they are so plain I decided to add a little design.


I painted around the edge with a few coats of black.


When that was dry I taped out my design (and started painting again before taking a picture)


Tip: add an extra coat of paint on top of your tape before you add your second color and it will seal the edges to ensure nice clean lines.


I painted the rest of the cabinet bright, glossy white and peeled off the tape to reveal this design.


And here it is with the doors hung.  I still need to buy a plate for the outlet. (REALLY sorry for these crappy pics but it's a gloomy day so bad lighting inside)


I wish I had a before picture!! But just trust me, it was bad.  (White, dirty bottom, plywood w/ plastic covering as the counter, and orangey wood upper cabinets.) Now I have a counter top to hold my kitchen aid, roll out cookies, and all those other fun kitchen tasks! (obviously cookies are my priority)
Next: my bathroom!
Ps, even if you have nice countertops in your kitchen, a cheap remnant countertop would be great for a craft room, as a shelf above your washer/dryer... oh the possibilities are endless!!


And in case you were wondering, this is how we sit on the couch. Every time. (By her choice)


Monday, June 24, 2013

I want...

...a drum side table.  They are all the rage right now and I want one.  They come in all shapes, sizes, colors, and styles.  Want to channel your inner Moroccan? Here's a moroccan style drum stool.  Feeling Glam? Solid gold.  Granny style? Hand painted floral. Really. Every. Style. But I have yet to find one with a price tag I love. I was at Home Goods the other day and they had tons.  But they were all over $60.  That's more than we paid for our couch! (okay, bad example.  Some friends gave it to us for free) But really, just look at them with me.


West Elm can do no wrong.


This one is beautiful but over $200. Ouch.


I also love this wire look from Urban Outfitters.


Loving this color.

So? What do you think? Would you take the plunge?

Friday, June 21, 2013

Chair Redo in the longest ever tutorial

It's finally done!!!! I can finally share my chair redo with you that I told you about in this post.  Okay, so I am quite the thrifter. I try and make it out thrifting at least once a week. About a month ago, I was at the D.I. and there was this one worker rearranging things right where I was looking around. Anytime I would ask about something he would rip off the tag and tell me it was a few dollars less than the tag said. (I've never had this happen before, I don't think it's what he's supposed to do. But I wasn't about to argue haha) So when I saw this chair for $8, I was more than happy to pay that. It is a really well built chair, I could tell by examining it. When I asked the guy for a ticket so I could go pay for it, he ripped off the tag and said "I'll give it to you for 5 dollars. Happy Saturday." He was quite the salesman.


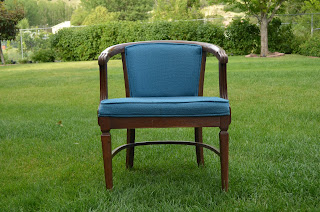
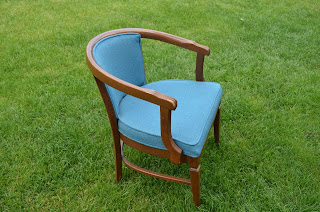
I really liked the structure of it but the upholstry? Not so much.  So I started tearing it apart.  Now people. When you hear "oh reupholstering is so fun! You get to rip the chair apart! DON'T BE FOOLED. Maybe I picked the chair made by a staple happy person but seriously, this process gave me blisters. Not to mention it took about 6-7 hours to get it apart.


As you take your chair apart, remember how you're doing it so you can put it back together easily.  Luckily this chair was pretty straight forward: unscrew the seat from underneath, take off the backing. If you're having a hard time finding staples to start taking a piece apart, (it took me a minute to figure out where they were for the back) flip the chair over.  This is on the underside of the back of the chair.


This is maybe half (or less) of the staples I took out of the seat alone. Seriously, every layer of fabric was stapled 1/2 inch apart. Who was this mad stapler person?? Luckily my sweet mom was helping me with this.


Once I had all of the upholstery off, we put this stripper all over the wood.  There are a lot of different products but this one is really potent making the process easier and faster. Follow the directions on your bottle. (this one said to put it in a spray bottle for application)


We let it sit for about 10-15 minutes and wearing gloves, scraped it off with a credit card. I strongly recommend wearing thick rubber gloves for this.  We were wearing surgical-type gloves and had to take breaks because our hands would start burning. Like I said, this stuff is potent and got the job done in basically one to two coats.
Side note- I couldn't help but giggle everytime my mom referred to the stripping agent: "Let me go get the stripper out of the basement. Let's let the stripper sit on the chair for a while." haha oh the immaturity.


Not pictured: I sprayed the chair down with the hose to get the bulk of the stripper off and then wiped it down with a bucket of warm soapy water and a rag.

Next we gave it a really good sanding with a medium grit sand paper to take the rest of the stain off. Then I used Minwax special walnut stain to apply one thin coat. I let it dry and added 3 coats of gloss polyurethane (sanding between coats with very fine sand paper).


Here's where my mom really came in.  She is an amazing seamstress (like, made hers and my sister's beautiful wedding dresses, makes luv-sacs type of amazing).  She had a big bolt of this pretty black leather type fabric on hand and that's what I decided to recover the chair in- can you say free ninety-nine?? So this is the cording and the only picture I took of the sewing process. Basically we used the old seat cover as a pattern and cut the pieces out to be the same size.


I'm not going to go into detail on the sewing portion because A: I didn't take any pictures and B: my mom was the magic behind that portion. For example, she figured out the yardage we needed and cut it all out, I just sewed it all together under her direction.

Skip forward to the cushion part.  I bought a 3 inch camping pad from my grocery/market place for $21.  I felt good about this since foam is pricey and it was a big piece of foam I can use for multiple projects. So I traced the original board onto the foam and used an electric knife to cut out the shape. Next I put the foam inside the chair cover with the board on top, wrapped the fabric around and stapled it. Does that make sense? You're going to want your fabric pulled tight, so if you kneel on your board it will help push it down while you staple.

After that was all attached, I took the cording and stapled it around the bottom edge so the round part sticks out. Sorry if you can't tell in the picture, I took in on my phone.  


Once that was done, I stapled the back pieces to the back of the chair with a piece of 1 inch foam in between.  I just hot glued an edge I had bought at the fabric store around the back to cover up the staples. Once I had the back done, I screwed the seat back on and I was done!


And here she is in all her glory.


Much better than that orangey wood and ugly blue upholstery.


I'm still trying to decide which pillow I like more.  The bigger square one is what I bought for the chair but I grabbed that long rectangular one off my bed and I think it fits better. What do you think?

One more before and after:


Total cost: $5 chair, about $5 worth of foam, fabric, staples, sand paper, and stain on hand, $4 polyurethane 
= about $14
plus a $10 pillow (on clearance at Hobby Lobby) 

And if you've made it to the end of this giant post, congrats!! Here's a stella picture as your reward :)


She's a weird one.

Happy weekend!! We're off to the family cabin to ride some 4wheelers and stuff our faces.


Thursday, June 20, 2013

Plate wall

Have you ever heard of dwelling gawkr?? I am about to make your day if you haven't.  If you have a smart phone, download the free app called Dwelling Gawkr. It's like pinterest but only interior design stuff.  I might spend more time on there than I do on pinterest. Which says a lot about the app. Okay. So now that you can waste as much time on your phone as I do, I have something to show you.


Sad, right? It's this awkward little spot in my kitchen between my bathroom and my pantry (you know you want your house to be laid out like mine) Anyways, I have been seeing a lot of plate walls lately and thought this was the perfect spot to put one.


Enter these beauties.  I got them for 25-50 cents a piece at my local thrift store (the D.I. if you are in Utah). The middle one was my initial inspiration. Lately I am into bright, flowery designs, plus it has a beautiful gold edge! So I picked out some other plates that pulled some of the colors or had gold detailing. I brought them home and washed them (because I'm that much of a clean freak) and laid them out on my floor in a pattern I thought would look nice.


Look at that edge!

Next, I started with the middle plate, held it up to the wall and marked 2 spots underneath it with a pencil.  This is where I hammered in the bottom 2 nails. Next, I set the plate on the nails, made sure they were holding it flat against the wall and gently nailed in 2 more along the top corners of the plate (I know, they are round plates but let's pretend for a second they have imaginary corners) 


I repeated this process until all of the plates were secured on the wall.  Those babies aren't going anywhere.  


What do you think?  I think it's a perfect space filler for a kitchen or dining area.  I would eventually like to paint the nails either white or gold, but I was too impatient to wait for paint to dry today.