Monday, November 9, 2015

Main floor powder bath

This was meant to be a quick project. Tiny room, not much effort, no big deal.  HA. I forgot how I had a baby and projects are never going to be the same. This room took me weeks. I had to hammer between naps, and wear him while I painted.  It was a bit of a juggling act. Not to mention I did this to keep me busy while my husband traveled 4 times that month. As if I needed help staying busy. :)

Before:


I took the doors off the vanity before I took this. Shhhh just pretend they're still there.


Not a horrible color. But it was pretty dull and all the other walls were really marked up and a gross off-white. Not to mention the towel bar... you don't need a towel bar to hold full size towels if you're not going to be showering in here. Duh.


I started out by painting the vanity bright white.


 Then I painted the bottom 2/3 of the wall white and the top 1/3 jet black.


Then I nailed up these boards.


P.S. If you think it's a good idea to hammer while you're baby wearing, think again. Haha poor buddy.


And then I caulked them and filled in the nail holes.


And then I painted them white.


And here it is all finished!!


These are some paintings I did. I thrifted the frames and just used leftover house paint I had on hand. And because every room needs some greenery but this room doesn't have a window, I threw in a fake Ikea plant.

I still want to get some hardware for the vanity and I have a new light I need to install.  But it is such an improvement.

Have you ever done wainscoting yourself? Would you attempt it?

Next up: The Dining Room!

xoxo Bre


Friday, November 6, 2015

Entry Makeover

So this house had a lot of 2 tone... Brown, green, and tan. I think they painted it back in 2007 and hadn't touched it since. The entry had this really bad poo green wall right when you walked in. And it just needed to go.  So I painted it white and then did a little wainscoting on it. I did this when I was 37 weeks pregnant and so I didn't take very many process pictures... I need to be better about that. But at the time it was all I could do to just get this done.

Before:


You can see how the wall is green and the rest of the walls are tan.


And the green inside the little cutout... WHY


One coat of  paint


Gaps filled in


Painted.


Also re-did my table while I was at it. The top used to be a really water warped, chipped piece of chip board. You can see it in the first picture.  I bought the table at a thrift store for like $15 with the plan to replace the top. 


I bought a piece of wood at home depot and had them cut it in half for me right there at the store.  I unscrewed the old top and just screwed the new top on with the same hardware. 


Stained it with one of my favorite stain colors: Classic gray by Minwax
I wipe the stain on with a foam brush and then wipe off the excess with a paper towel.


And finished!!


I love how it turned out and how crisp and clean it feels now. Goodbye poo green!

So I learned a few things with this project.  If you are hand nailing the boards as opposed to a nailgun, there is a little metal tool you need called a nail setter.  It pushes the nails in further and then you just patch the holes.  Also, using caulk around the edges will not only seal it and make it look like part of the wall, but it holds the boards to the wall like a glue.  
I sort of just wing it with most of my projects and learn as I go.  I don't necessarily recommend this method because it can be very painful sometimes.  For example: I nailed this design up twice.  The first time I did the long boards horizontal and the short boards vertical.  It just didn't work for some reason.  So I carefully ripped it down, and re-hammered it with the long boards vertical and the short boards horizontal.  It was a ton of extra work and my arms were not happy.  But it was worth the extra work to get the end result I wanted.

Have a good weekend!

Come back next week to see the main floor powder bath!

xoxo Bre


Thursday, November 5, 2015

New house tour

This is going to be really long because I tend to ramble. And it's filled with run on sentences because #mombrain is so real. But here's the story of how we found our house. If you don't really care how we found it, just scroll down to the pictures.

Okay so we looked for a house for a long long time.  I'm picky and had certain things I wanted in a house. We also weren't sure where we would end up for good. But then I got pregnant and there was zero room in our little victorian for a baby. We had 3 bedrooms upstairs but that upstairs was creeeeepy. And there was no chance I was going to put my brand new baby up there. And then a few other things came to play with Tom's job and we decided utah county was going to be our home for sure. So we really buckled down on the house search. We looked into building but with the timeline we wouldn't have been in by the time our babe got here so that was out. (Plus, the thought of paying for a fence and putting in a yard wasn't very appealing) Our realtor sent us over a bunch of homes in the area we wanted and I found one I wanted to walk through. You guys. It was  baby blue. Walls, ceilings, railings, in every. single. room. BABY BLUE. It was horrible. I left with this song stuck in my head. And then we found another one we liked in the neighborhood we wanted. (same neighborhood as blue home) We walked through that night and it was my home. I just knew it. We put an offer on the next day, which they counter offered the next day. And then Tom just wanted to wait for a bit. Buying a house is so scary! We wanted to be sure we could comfortably afford it and at the same time grow into it. Plus, buying the 2nd house we walked through felt really crazy and impulse-y. We talked more and decided we were going to keep looking.  So Tom started sending me MLS listings again and I literally cried looking at them. Carpet in a dining room? Who does that? No basement? Where will I send my kids when they're driving me crazy? (I may have been pregnant and hormonal but I just knew my house was getting away.) And then we talked more and decided we would accept the offer and literally 30 minutes later our realtor called us and said they received a higher offer but because they signed the counter offer, we still had 3 hours to accept and they would be locked in with us. So we scrambled and signed the papers and accepted. And then 30 days later it was ours! Okay so here are the pictures from the night we walked through. The house was vacant which made them really motivated to sell.


Entry


Entry from the living room and view into office


Office


Office


Living room from the front door


Tom and our realtor Will (who also happens to be a friend)


Living room from second story


I was mainly in love with the natural light and high ceilings


Half bath off living room


Dining room


Kitchen


Living room from the stairs... and can see into dining room and kitchen


Guest room


Laundry


Nursery


Main bath


Master


Master


Master looking into hall


Master bath


Master closet


Master bath from closet

And that's it! We do have a basement that's the same size as the main floor but it's just cement so those pictures would be kind of boring. Eventually we will finish it and then you can see it. :)

So basically our house was very brown, poo green, and 2 tone... And one very pepto pink/ peach crayon colored room.  It all changed very fast.  We painted 3 rooms before we even had Roman 2 1/2 months later.

Each room is already so different and I couldn't be more happy about that.  The people who lived here before definitely had different taste from me.  But what I loved most about this house is that everything was just cosmetic and could be easily changed as opposed to some of the houses with major issues. I will slowly be going through each room and showing you what I have done so far as well as what my plans are to finish them from here on out.  Starting with the entry.

Thanks for taking this journey with me!

xoxo Bre


Wednesday, November 4, 2015

So, hey....

It's been a looooong time. So much has happened in my personal life since the last time I blogged. Let's dive right in.
1: We bought a house!! I love it and have enjoyed making it my own! But it has really really been a labor of love. Emphasis on the labor part. I have been so super busy doing project after project and I can't wait to share them with you.
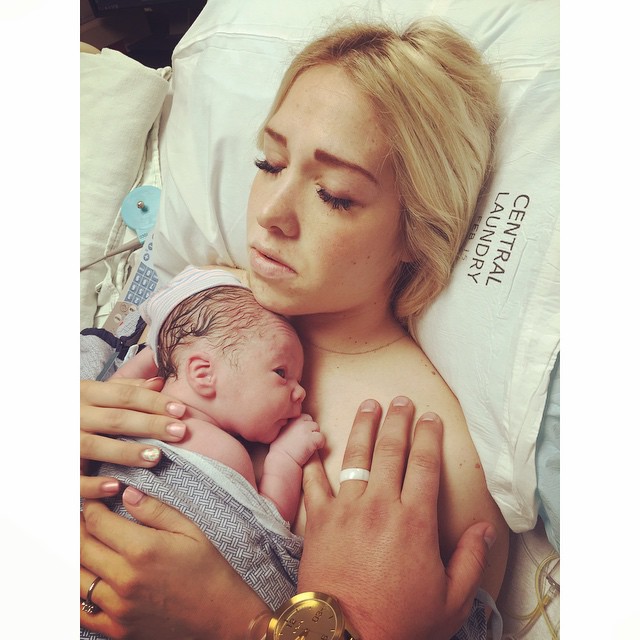
2: I had a baby!!! What. I know.


Meeting my sweet Rome for the first time


Picture by Emmy Lowe


My family on the 4th of July
(notice how he's staring at me haha I think the love is mutual)

His name is Roman and he was born on May 31, 2015. I'm just going to go ahead and be super cliche right now: He lights up my freaking world. I love him so much and instantly forgave him for the misery some call pregnancy. ;)
That's the main reason I stopped blogging. I got pretty bad morning sickness that lasted from mid September to January. That was the longest fall of my life. And then once I was feeling better we bought our house and moved (I was 28 weeks pregnant and don't recommend moving while pregnant. EVER.)
So I guess I only had 2 main things happen, but those are pretty big, yeah? Anyways, Ashlee is moving on to bigger and better things (AKA she's like this amazing model and travels all around doing runway shows. Pretty much she's way too cool for school) So we decided I would go back to blogging by myself. And now that I have a house with never-ending projects, it shouldn't be a problem coming up with content.
Guys. I am so excited to be back! And also so amazed that when I logged on I'm still getting daily page views despite my lack of blogging. I'm going to try my best to blog lots. But bear with me because I do have a very demanding/non sleeping 5 month old.

Next post: House tour!!! As we bought it... Kinda scary haha

Xoxo Bre

Friday, September 12, 2014

Restoration Hardware Headboard Knockoff... On a major budget!!!

Okay, so I have been busy working with a client finishing up some rooms and I can't even wait to show you the final results!! For now, you get a sneak peek while I do a headboard tutorial.
You guys.  This is my favorite headboard I have made to date.  And once it was done I was reeeealllly wanting to make myself one.  But I will have to wait until we move again.
Anyways. Here goes.


Now that is VERY Restoration Hardware if you ask me!

Start with your board.  Lumber can be pricey so I get the plumbing underlayment from Home Depot.  It comes in a giant sheet... like 4'x8' (1" thick) and ranges b/t $10-$20.  While I am there, I have them cut it down to the dimensions I need on their giant saw (so far I have never been charged, but usually the first 2-3 cuts are free)  You will want your headboard 5' wide (the width of a queen bed) and this one I only did 3' tall. Because that is what would fit inside my car haha.  But you can make it as tall as you want really.
Then I got 2 furring boards. They are 1"x3" and 8' long.  Have them cut them down into 3 pieces: 1 5'6", and 2 that are the height of your headboard. If your headboard is 3' high, you will get 2 pieces that are 3' long.
Sand and stain your furring boards (these will be the boarder of the bed) I used Minwax Classic Gray


I always lay my headboard on a folding table, it is just easier to work with.

I got my fabric on sale (always look for the upholstery fabrics to go on sale). It was 50% off, regularly $20 a yard.  And for a queen size bed you need 2 yards which is 6 feet.  Make sure your fabric is at least a yard wide.  Mine was 48" which was plenty.  I went with a neutral beige linen because I was going for the RH look.


First you will cover your board with batting.  I got this on sale also.  If you buy in the bag, it is usually twice as much as if you buy it by the yard.  Just a little tip :)
Pull it around and staple it to the back.  I got my stapler at WalMart for like $20 and I have used it SO much.  It works great.  It is Stanley brand and not a plug in or anything.  You just need a little muscle :)


Next, add your fabric.  Make sure and pull the fabric really tight and fold the corners so that they lay smooth. With the wood boarder, they don't have to be perfectly beautiful.

Below: Look at that coloring!!! I am in love with this stain color.  I use a foam craft brush to brush on and then wipe off with a paper towel.


Next you will build your boarder.   So find the sides that you think are most beautiful and put them face down on the floor.  You will make a 'u' shape with your 5'6" one at the top.  I bought these little metal corners at Home Depot and they were SUPER strong.  Use a triangle to make sure your corners are perfectly 90', mark where your screws will go with a pen because as you screw it will move a little and as long as your screws are in the right places, it will be a perfect angle.


Okay, getting this to fit was a bit more tricky than I thought.  It was a tight squeeze which was great because my measurements were exact. You will probably have to mess with it a bit and use some muscles to make it fit.  Then use more of those metal plates (but they're just straight like this) to screw into the back.  I did 2 spaced out on each side and 2 on the top.  That thing is not going anywhere.


Then you will start with your nailhead trim. (spoiler- I found this at WalMart for a fraction of the price you would pay at a hardware store!! They worked really great! I got 3 boxes and didn't use them all.)  I just eyeballed it and spaced them about an inch and a half apart.  Tip: when you're getting to a corner, put one in the corner and then move back towards the nailhead.  This will make sure you get it placed perfectly in the corner and you can fudge a little on the spacing between the other ones. Does that make sense?


Okay. I'm dumb. I didn't take any pics of the rest. But it's easy.  This is held up by 2x4's and once the bed is pushed up against it, it will stay! Promise!  Measure your bed from the floor to the top of the mattress and subtract an inch.  This will be where you mark your 2x4 and where your headboard will sit off the ground.  Mine happened to be 28" tall.  Make sure your 2x4's are perfectly even and screw them into the back of the headboard.  I always draw a line on the back of the headboard where I want the 2x4's to hit.  Screw in and you're done!


Okay okay.  That's it for the sneak peaks.  But look at that headboard!!! Swoon. I want one now.

Price breakdown:

Plywood board: $20
Wood boarder: $3
Batting: $9
Fabric: $20
Nailhead: $3
Mending Plates: $5
2x4: $2

Grand Total: $62.00

You heard me.

And I think this took 2-3 hours.

So basically, why are you not on your way to Home Depot to get started right now??

Thanks for reading!
xoxo Bre